What to Learn to Become a Real-Time Graphics Programmer
You want to be hireable as a graphics programmer—what do you actually study?
Picture this: you skim a job posting and it’s a blur of terms—Vulkan, shaders, PBR, “optimize for the GPU,” “write engine code,” “implement rendering techniques.” It feels like there’s a secret curriculum you missed.
In practice, real-time graphics programming (the kind used in games and interactive apps) is a split job. You’ll become far more hireable when you learn both halves—but you’ll usually do that in a deliberate order rather than trying to master everything at once.
This guide walks through the learning path that repeatedly shows up in professional rendering teams: first get the “CPU side” working, then deepen your “GPU side” into lighting, materials, and performance.
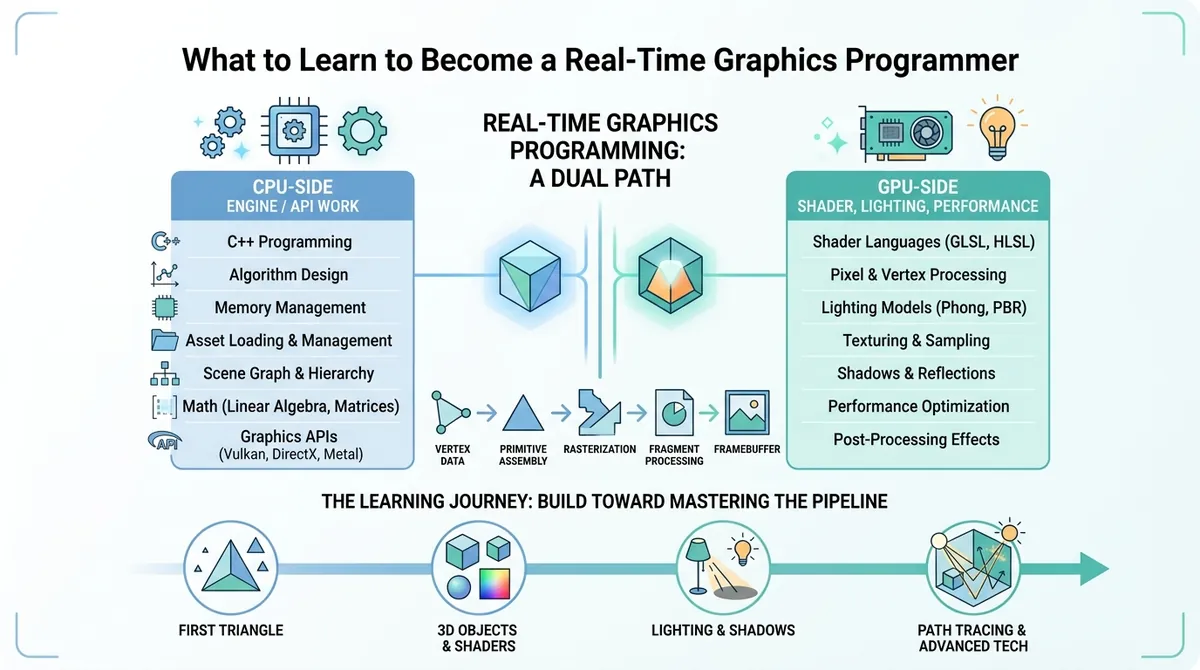
Real-time rendering is two jobs in one
Modern rendering is like running a restaurant with two managers at the same time.
- One manager works the front-of-house: schedules customers, takes orders, and moves tickets along.
- The other manager runs the kitchen: turns ingredients into meals quickly and consistently.
In graphics, those managers map cleanly to:
1) The CPU side: explicit graphics APIs and engine glue
The CPU side is the part of the program running on the CPU (Central Processing Unit). The CPU coordinates what data the GPU should process and when.
You’ll encounter modern “explicit” graphics APIs such as DirectX 12, Vulkan, and Metal. “Explicit” here means the API gives you a lot of control and responsibility: you specify how resources move, when work happens, and how memory is organized. That control is powerful, but it’s also why this area can feel intimidating at first.
On the CPU side, graphics programmers typically build or extend engine systems for tasks like:
- loading meshes and textures (assets)
- creating GPU resources (buffers and images)
- issuing rendering commands in the correct order
- integrating with the rest of the engine (scene management, frame loop)
2) The GPU side: shading math, lighting algorithms, and what runs fast
The GPU side is where the GPU (Graphics Processing Unit) does the heavy parallel work—especially shaders.
A shader is a small program that runs on the GPU. Shaders are responsible for turning geometry (triangles) into pixels on the screen by computing colors, lighting, shadows, and other effects.
On the GPU side you’ll learn:
- how lighting and shading models work
- rendering techniques such as shadows, ambient occlusion, and post-processing
- what is fast versus slow on modern GPUs, so your effects run in real time
Why learning both at once makes most people stall
Trying to learn CPU-side API complexity and GPU-side rendering theory simultaneously is a common failure mode. It’s like learning to both cook and manage inventory before you’ve ever cooked a meal.
A practical strategy is to pick a focus first, then expand.
If you focus on the GPU: start with a path tracer
The fastest way to understand GPU-side rendering is to see a correct renderer in action, even if it’s not real-time. That’s where a path tracer comes in.
A path tracer is a rendering program that simulates how light bounces through a scene. It traces “paths” of light from the camera into the world, accounting for reflections and refractions, and accumulates many samples to approximate realistic results.
Movies and offline renderers use the same core idea, and real-time renderers try to approximate it.
This matters because once you understand what the “correct answer” looks like, the real-time tricks start to feel less like magic.
A popular learning project is Ray Tracing in One Weekend, which walks you through building a ray tracer step by step. Even though it’s not a full game engine, it teaches the core geometry and light-transport concepts.
What a path tracer teaches you (beyond the final image)
When you implement a path tracer, you inevitably touch fundamental building blocks:
- Ray intersection with geometry (deciding what the camera sees)
- random sampling (choosing how to approximate integrals numerically)
- vector math (directions, normals, dot products)
- recursion or iteration for multiple light bounces
And you develop intuition for why certain “realistic” effects are expensive—and where approximations can save time.
If you focus on the GPU: learn Physically Based Rendering (PBR)
Once you understand the idea of realistic light transport, the next professional milestone is Physically Based Rendering (PBR).
Physically based rendering is a set of material and lighting models designed to behave consistently under different lighting conditions. “Physically based” means the equations follow principles grounded in how real materials interact with light.
PBR is often described as “principled,” because when artists and engineers follow the rules, the same asset tends to look right across many scenes.
Why PBR replaced the “random equation” era
Before PBR became standard, teams often used hand-tuned shading models with lots of tweaks. Those models worked for one lighting setup but broke when conditions changed—sometimes making assets look too dark, too bright, or “glowy” in the wrong ways.
That created a workflow problem: assets often needed multiple versions, and artists and engineers spent extra time chasing consistency.
PBR reduces that pain by giving materials a stable interpretation of roughness, metallic behavior, and reflectance.
The key math basics you’ll keep reusing
Many people worry they need advanced math to touch PBR. In reality, you mostly need a small foundation—while realizing you can apply it in many directions.
The recurring essentials are:
- linear algebra: matrix multiplication, dot product, cross product
- trigonometry: angles, sines/cosines
- a little calculus: understanding how changes and rates behave (especially when reading deeper material models)
That’s the baseline. The tricky part is not memorizing formulas—it’s learning how to interpret them in rendering contexts.
A realistic learning order that makes you job-ready
At this point, the path can still feel vague, so here’s a grounded sequence that matches how many successful graphics programmers actually learn.
Step 1: Get a first triangle on the screen
For GPU-focused learners, the CPU API details can wait—until you can render something.
The goal is to reach a working loop: create a window, submit a render call, and see a triangle.
This doesn’t need to look pretty. It needs to prove you can connect CPU code to GPU processing.
Step 2: Add a mesh and a basic shader
Next, you move from a triangle to a mesh, which is a collection of triangles representing a 3D shape.
Then you introduce basic shader stages—starting with transforming vertices and outputting a color.
This is where beginners often gain the most confidence, because suddenly the screen becomes a direct reflection of the code you wrote.
Step 3: Start implementing real lighting models
With the pipeline working, you can layer in lighting. For many learners, the most motivating path is building toward PBR concepts and then expanding into shadows, ambient occlusion, and post-processing.
Step 4: When GPU correctness is there, focus on performance
Once images are plausible, performance becomes the next obsession. Real-time rendering budgets are tight: you’re racing to hit frame times measured in milliseconds.
At that point, you learn what’s slow on the GPU—not by guessing, but by profiling and understanding how data flows through the pipeline.
The programming languages and shader languages you’ll bump into
To write and ship rendering code, you’ll rely on a few main technologies.
C++ for engine and CPU-side work
In game development, C++ is still the default language for a lot of engine code and performance-critical systems.
C++ matters because rendering often needs tight control over memory and performance characteristics, and many graphics APIs are designed with that mindset.
Some teams use Rust, and WebGPU is relevant for web-based graphics. But in terms of “what job postings most strongly expect,” C++ remains the dominant CPU-side expectation.
HLSL (and sometimes GLSL) for shaders
For shader programming, you’ll most often see HLSL (High-Level Shading Language) in DirectX-centric ecosystems.
Another option is GLSL (OpenGL Shading Language). Many multi-platform engines handle this by compiling or translating shader code so the same idea runs across backends.
Where does Machine Learning fit for graphics programmers?
Machine learning (often abbreviated as ML) is the field of teaching computers to learn patterns from data.
In recent years, people have used it for many tasks that sound tempting: faster rendering approximations, denoising, upscaling, and content generation.
But there’s an important distinction between hype and usefulness. ML can be valuable when it tackles a narrow problem where learning from data genuinely beats manual heuristics.
For most graphics careers, though, the core hireability still comes from rendering fundamentals: understanding shaders, pipelines, lighting models like PBR, and the performance constraints of real-time systems.
ML can become an extra tool—not your replacement for core rendering expertise.
The mental model that makes everything click
Graphics programming becomes clearer when you treat it as a pipeline rather than a pile of tricks.
- The CPU prepares data and commands.
- The GPU executes shaders across many parallel invocations.
- Rendering correctness comes first (your images look right).
- Then performance comes next (your frames arrive on time).
That model helps you avoid confusion when you encounter new effects. Each effect is “just” another set of steps in the pipeline—more math, more sampling, more memory, more careful scheduling.
Conclusion: becoming a graphics programmer is mastering a pipeline, not chasing buzzwords
To become a hireable real-time graphics programmer, focus on the two halves of rendering: the CPU side (explicit APIs, engine integration, resource and command setup) and the GPU side (shader math, lighting techniques, and performance constraints). Start by proving you can render something, then deepen into path tracing concepts and Physically Based Rendering so your materials and lighting behave consistently. Keep your math foundation grounded in linear algebra, trigonometry, and a little calculus, and treat ML as an optional toolbox rather than the core path to rendering skill. The result is a practical expertise that maps directly to what teams ship in the real world.
Comments (0)
No comments yet. Be the first to respond!
Leave a Comment
Your comment will be visible after review.